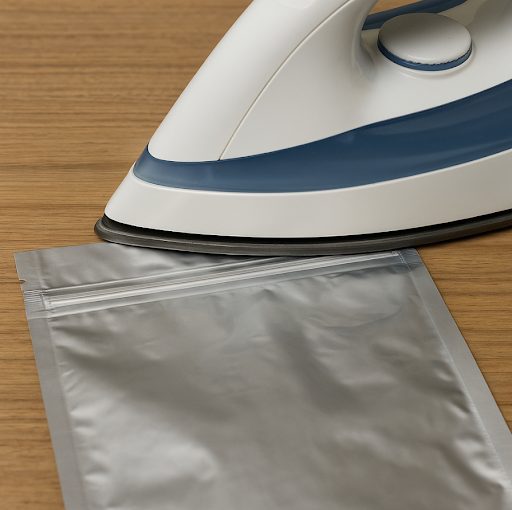
You don’t have to break the bank with an industrial sealer or large machine to close up tight Mylar bags. If there is a clothes iron taking up space in a closet, that is your tool. No kidding. With a bit of heat, patience, and a firm grip, you can close like a professional.
What You Will Need
- A clothing iron
- A heat-resistant surface that will not burn
- Your filled mylar bags
- Parchment paper, paper towel, or a thin towel (optional)
How to Seal The Mylar Bag
1. Pack the Bag
Scoot your contents in, but don’t overpack it. Leave a few inches of space at the top so the edge can close up tight and neat.
2. Flatten and Straighten
Place that pouch flat. Fingers along the top edge, press out wrinkles or creases. Wrinkles are trouble starters—they allow the air to seep in afterwards.
3. Guard the Surface (Optional)
Place a layer of parchment or paper towel on the line you’re sealing. It’s your guard. Otherwise, the iron may adhere to or burn the film if you use too high of a heat.
5. Set the Heat
Use low heat, about the “cotton” setting. Steam indicator off. You need dry even heat, not a fog of steam.
6. Seal Slow and Gentle
Press it in softly along the top strip, holding for maybe three or four heartbeats. Slide it to the side, easy and without tension. You can watch the plastic will loosen, almost melt back onto itself. That’s when you can be positive that it’s holding in place. and stuck together.
7. Let It Settle
Leave it there for a second and consider it. Rub your hand over the seam, it will be flat, firm, and seamed like a single line. If it is edged softly or cracked small, re-iron the place another fraction of a second.
Seriously, don’t complicate it. Once you master one or two custom mylar bags, you’ll be off the beat. It’s second nature, so relaxed. There’s some weird satisfaction in it, like leaving a trace on the chunk of time and knowing that it’ll still be just the same way you left it.
Little Tricks That Make a Big Difference
- Work from the middle out toward the edges. That forces more air out.
- Leave one corner open, force air out, then close and seal it up all the way.
- Don’t crank heat way up, you want to make sure you don’t want to melt it!
What Else Can I Seal a Mylar bag With?
A clothes iron is not your only solution. There are a few other convenient gadgets that will do the job just as effectively, depending on what you might have available.
Hair Straightener:
A go-to for small-batch sealing. The heat plates are ideal for thin gaps, and you can shut down over the edge with caution. Just be sure to use it on medium heat and no steam.
Impulse Sealer:
These are used to seal plastic and Mylar in particular. You simply squeeze the handle down, and it melts immediately. They’re quick, uniform, and super good for bulk sealing—but pricier than household equipment.
Vacuum Sealer:
This one’s worth it if you desire air to be sucked right out. Some units have Mylar-compatible accessories. Be sure your sealer can accommodate thick foil layers before attempting it.
Clothing Iron Alternatives:
If you’re handy, a heat-resistant flat area and a hot metal spoon will seal a small Mylar edge in a jam. Not the most ideal, but you’ll survive until you can get to proper tools.
No matter if you do or do not use one of these methods, you require consistency and patience. Try one bag first, become familiar with the sensation of the seal, and when it’s smooth and is bonded, you’re ready to go.
How to Tell It’s Done Right
Put the closed edge under light.
There should be no holes, tinted minute pinholes, non-uniform areas, or areas over the zipper which remained unsealed.
The seal should be smooth, slightly shiny, not burnt and rough.
Pull on it gently. If it still remains intact, you did it.
What You Can Seal in Mylar Bags
- Food
- Herbs
- Coffee
- Grains
- Rice
- Candy
- Tea
- Pet Foods
- Flower
- Pasta
- Snacks
- Spices
- Freeze Dried Meals
Why Seal at All?
Air spoils things. Water does too. Light does it even more. Those three are sneaky wrecking crews that suck freshness, flavor, and life from your product. Sealed Mylar bag keeps them out. It’s as if locking a door between your items and the world.
They use them for anything-coffee, tea, pasta, dried fruit, dog treats, or long-term food storage. If it’s dehydrated, it goes in one.
Why It Works So Well
Sometimes it is as simple as that. A clothes iron is broad, flat, and already resident on your laundry shelf. It is a five-buck solution to a problem that does not require a hundred-dollar gadget.
One Last Thing; Label Everything
Future you will thank you. Date the contents and what is in there before you seal. It saves so much guessing later. Trust me, nothing is more frustrating than having to make a blind guess whether or not that bag contains coffee beans or dried strawberries.
Custom Mylar bags even improve on this step. You can print your logo, company name, or even QR codes directly onto the pouch. No more tearing-off labels or erasable Sharpie scrawls. A tidy, professional look not only keeps you tidy but gets your packaging retail ready.
And if you’re a business owner, customized Mylar bags are not just packaging, it’s stealth advertising. Consider it: every seal, every face is a small billboard for your company. If you’re shipping snacks, coffee, or herbs, an inked design conveys to consumers that you care as much about appearance as you care about freshness. That’s why businesses such as Brandmydispo offer custom Mylar bags that look great and heat seal well.
The Bottom Line
Ironing Mylar bags is not rocket science. It’s simply smart, convenient, and pleasant. You hear the rustle, feel the warmth, apply the pressure, and.. Voilà! it’s done. A couple of seconds of toil gives you months (even years) of freshness. That’s it.